Posts

Electronics Basics for Kids: Lesson #4

Image
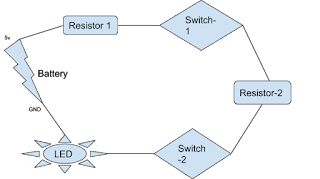
Lesson #4 Project : ‘Series and Parallel Circuits’ Follow the instructions below to complete your first project: Step 1. Today you are going to learn two types of circuits: Parallel and Series Circuit.        Series Circuit : To learn this Circuit we will use two switches in Circuit. To turn the LED both switches must be turned on.         Example:   Think of a one lane road. You can’t drive through if it’s broken. Same like “and” condition in your scratch. Parallel Circuit: We will re-arrange the above circuit. If you turn on any one switch of your circuit your LED will be turned on.        Example:   Think of a two lane road. If one lane is busy we can drive through the other lane. Same like “or” condition in your scratch. Step 3.Now make this circuit with help of your Arduino Kit and Breadboard: Series Circuit: Parallel Circuit

Electronics Basics for Kids: Lesson #3

Image
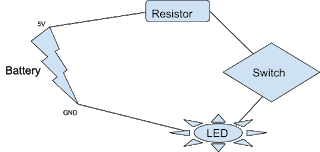
Lesson #3 Project : ‘My first circuit with a Switch” Follow the instructions below to complete your first project: Step 1.  Let’s make a diagram of circuit that we want to make.        Our goal is to add a switch in the circuit before LED so that we can turn it on and off when required. Step 2.Now make this circuit with help of your Arduino Kit and Breadboard: To make circuit right way you need to connect in way as shown in following pictures: ’

Electronics basics for kids: Lesson #2

Image
Lesson #2 Project: “ Reconnecting My first Circuit in a different Way” Further Instructions: We’re going to make same circuit that you made in previous class in different way Picture 1. Step 1. Make connection on breadboard as shown in the following pictures: Note: There are more number of holes on actual board than drawing in the above picture. Step 2: Before moving to next step you must understand what is a Breadboard? Question 1. What is a breadboard? Ans.  Breadboard is device used to make circuits temporarily. Question 2. What is inside breadboard? : Ans. In the picture above you can see holes are connected vertically and horizontally internally in breadboard. Holes in sides are connected horizontally whereas in center are connected vertically. Any other question? Step 3:Now, plan and make the same circuit in your own way and present it in next class.

Electronics Basics for Kids: Lesson #1

Image
Lesson #1 Project : ‘My first circuit’ Follow the instructions below to complete your first project: Step 1. Before making the circuit. You must know what is a circuit?        Circuit is connecting different components(parts) using wires to make a loop(circle). See the Picture. Step 2. Now, What is Resistor in the circuit above? : It is a component(Part) that is used to provide resistance(try to reduce the flow of electricity) in the circuit. Example:   1. If it’s windy it becomes hard for us to walk. 2. If the road is broken we have to drive slow. Step 3.Now make this circuit with help of your Arduino Kit and Breadboard: To make circuit right way you need to connect in way as shown in following pictures: Note: There are more number of holes on actual board than drawing in the above picture.